SAVE $4,000 A YEAR

Why You Are Holding This Manual
Every single year, the typical American household quietly loses between $3,500 and $4,500 to three entirely preventable traps:
1. The False Breakdown Trap
Discarding expensive appliances (dishwashers, washers, disposals) over simple 15-second mechanical jams that cost $0 to release.
2. The Planned Obsolescence Tax
Calling out contractors who charge $180 minimum diagnostic fees just to wipe an invisible wax film off an electronic moisture bar.
This manual does not contain generic Pinterest tips or messy baking soda volcanoes. Every protocol inside is a trade-tested mechanical or chemical restoration standard engineered to restore your equipment to factory tolerances using low-cost pantry chemistry.
Below, you will find Protocol 05, Protocol 16, and Protocol 01. Test them in your own home. See the immediate results with your own eyes. Then decide if you want the remaining 82 protocols on your bookshelf.
The 7 Core Pantry Actives
Distilled White Vinegar (5% Acetic Acid)
Sodium Bicarbonate (Baking Soda)
Liquid Dish Soap (Non-Ionic Surfactants)
3% Hydrogen Peroxide
Coarse & Kosher Salt
Citric Acid Powder
70%+ Isopropyl Alcohol
The Never-Mix Safety Matrix
- LETHAL GAS Bleach + Vinegar (or Any Acid): Produces toxic chlorine gas. Causes immediate lung and airway burns. Never combine.
- TOXIC VAPOR Bleach + Ammonia: Produces chloramine gas. Causes acute respiratory distress and severe eye damage.
- CHLOROFORM Bleach + Rubbing Alcohol: Produces chloroform gas. Highly toxic central nervous system depressant.
- PRESSURE RISK Baking Soda + Vinegar in Closed Bottle: Rapid carbon dioxide expansion will burst airtight spray bottles.
Surface Protection Guide: Prevent Costly Mistakes
| Surface Material | NEVER Use This | The Reason & Consequence |
|---|---|---|
| Natural Stone (Marble, Granite, Limestone) | Vinegar, Citric Acid, Lemon Juice | Acid reacts immediately with calcium carbonate in stone, leaving permanent dull etched spots. |
| Cast Iron Cookware | Prolonged Acid Soak (>60m) or Dishwasher | Eats away the baked polymerized seasoning layer and triggers rapid flash rusting. |
| Bare Aluminum (Baking sheets, filters) | High Alkaline Pastes (Lye, Washing Soda) | Strong bases darken, pit, and chemically corrode bare aluminum within 15 minutes. |
| Hardwood Floors | Steam Mops or Soaking Wet Mops | Forces moisture deep past polyurethane into tongue-and-groove joints, warping boards. |
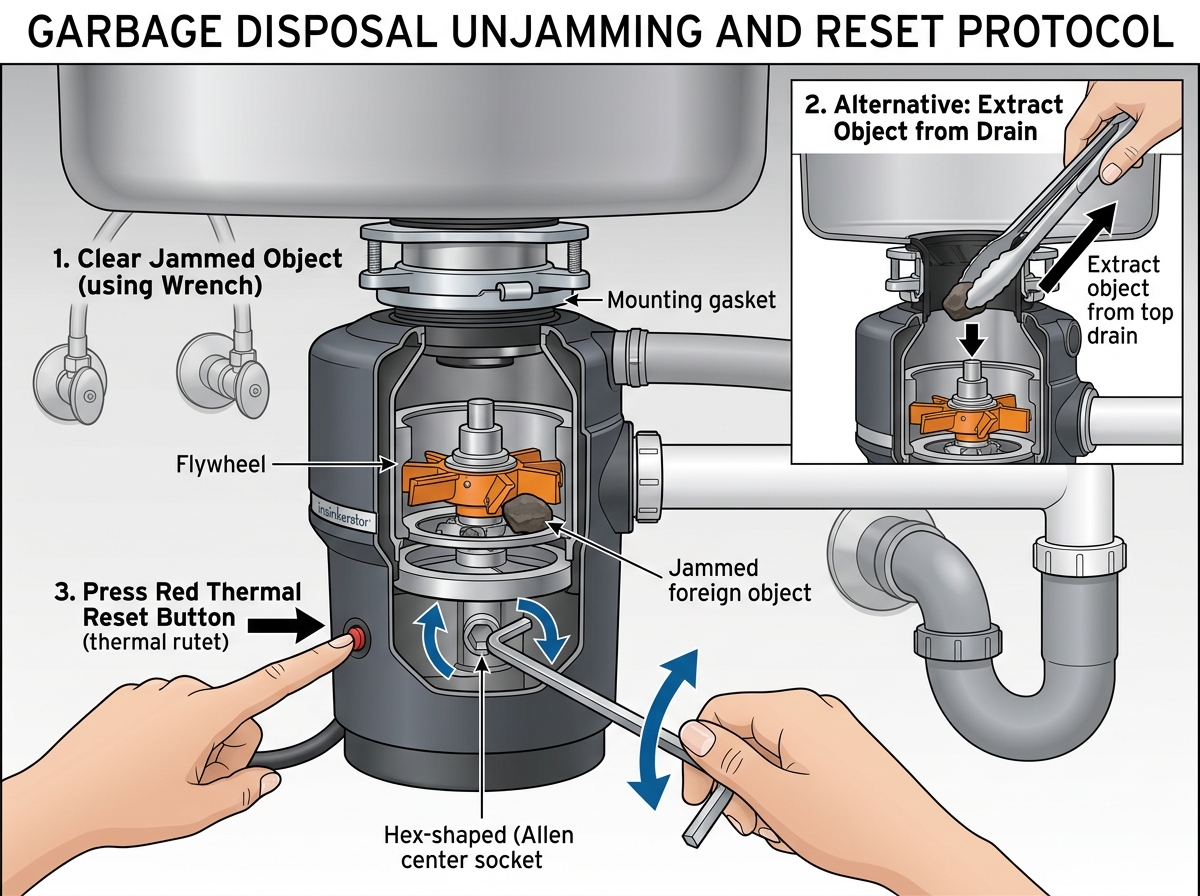
Garbage Disposal Hex Key Impeller Un-Jam & Red Thermal Reset
Disposal motor produces a dull electric hum without spinning, or is completely unresponsive and silent when the wall switch is flipped. Sink backs up with grey water.
A stray bone shard or fruit pit wedges between the spinning impeller lug and outer shredder ring. The stalled rotor pulls high amperage until the internal bimetallic thermal switch pops to prevent motor fire.
- 1/4-inch hex wrench (standard Allen key)
- Bright flashlight & needle-nose pliers
- 2 cups ice cubes + 1/2 fresh lemon
-
1Kill Power: Confirm the wall switch is OFF. For absolute peace of mind, unplug the disposal power cord beneath the sink.
-
2Locate Underside Socket: Crouch down with a flashlight and look at the exact dead-center bottom of the disposal housing.
-
3Seat 1/4" Hex Wrench: Insert your 1/4-inch hex key directly into the recessed hexagonal drive hole on the bottom.
-
4Force Bidirectional Levering: Crank the wrench firmly back and forth clockwise and counter-clockwise until the motor turns freely 360 degrees.
-
5Extract Foreign Object: Shine a flashlight down through the sink drain. Use needle-nose pliers (never bare hands!) to remove the dislodged debris.
-
6Push Red Thermal Breaker: Locate the small circular red reset button near the bottom edge and push firmly until it clicks.
-
7Cold Flush & Power On: Plug unit back in. Turn cold tap water on full force, then flip the wall switch. It will spin with a clean roar!
-
8Ice Hone Polish: Feed 2 cups of ice cubes and lemon half through while running cold water to polish the shredder ring lugs.
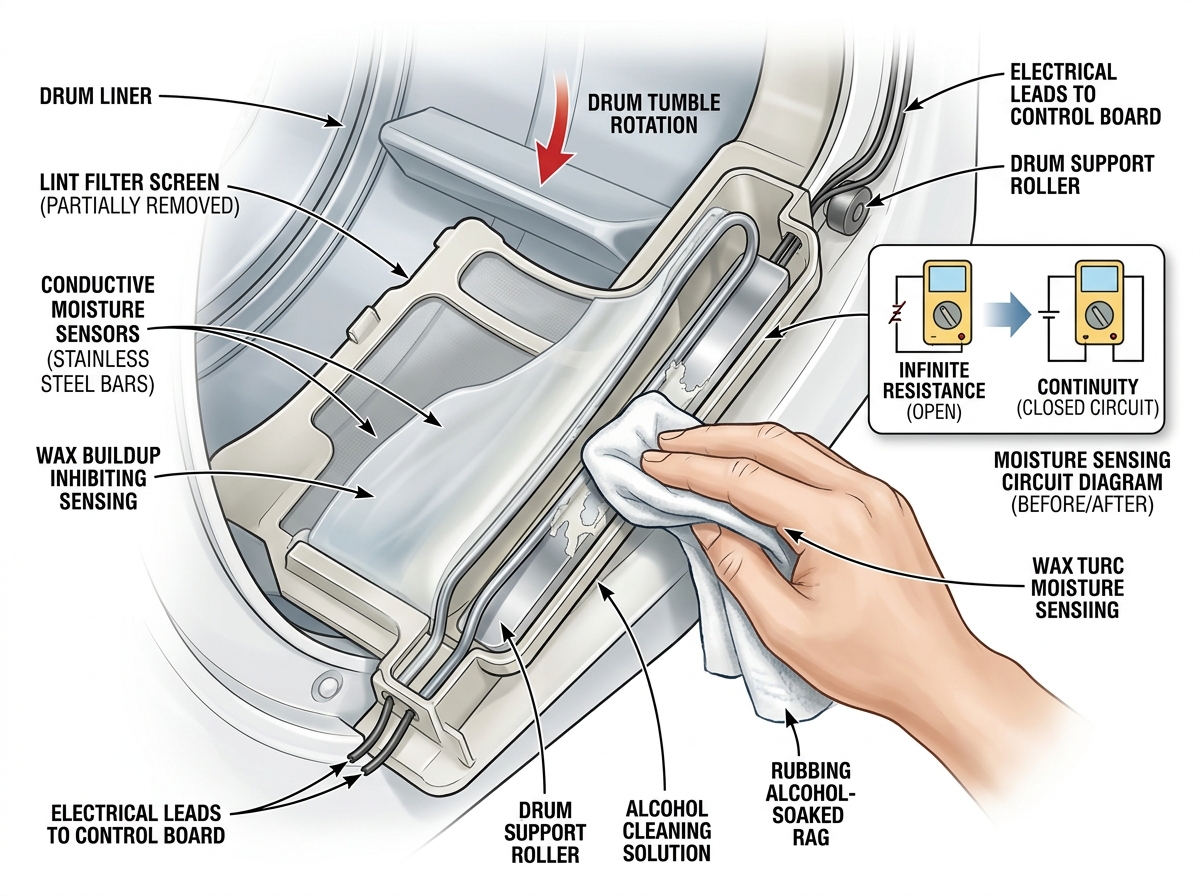
Clothes Dryer Conductive Moisture Sensor De-Waxing & Alcohol Wipe
Dryer shuts off prematurely on "Auto-Sense" or "Normal Dry" after only 10 to 15 minutes, leaving wet laundry. Homeowner is forced to run 2 to 3 consecutive cycles or use timed dry.
Commercial dryer sheets and fabric softeners vaporize paraffin waxes and quaternary ammonium salts. This forms an invisible insulating film over the metal moisture bars, blocking electrical conductivity.
- 70% or 91% Isopropyl Rubbing Alcohol
- Clean microfiber cloth or cotton shop towel
- Standard clean pencil eraser (for heavy build-up)
-
1Unplug & Cool Down: Disconnect dryer plug from the wall. Ensure the dryer drum has cooled completely to room temperature.
-
2Open Door & Pull Lint Screen: Open the front loading door wide and pull the lint trap screen straight out for complete working clearance.
-
3Identify Sensor Strips: Look directly below or beside the lint chute housing. You will see two parallel, curved stainless steel or chrome strips (~6 inches long).
-
4Feel the Invisible Wax: Drag your dry fingertip across the metal strips. If they feel slick or waxy instead of cold, bare metal, the sensor circuit is insulated.
-
5Saturate Microfiber with Alcohol: Pour 1 tablespoon of 70% or 91% rubbing alcohol onto the corner of a clean microfiber towel.
-
6Scrub Metal Bars with Friction: Rub vigorously back and forth across both metal sensor strips. You will see grey, oxidized wax residue transfer onto your cloth.
-
7Eraser Polish (Heavy Wax): If waxy film persists, rub a clean pink pencil eraser down both strips to mechanically lift residue, then re-wipe with alcohol.
-
8Flash Evaporation & Test: Wait 3 minutes for alcohol to evaporate completely. Plug dryer in and run a wet towel load on Auto-Sense—it will run to 100% dry perfection!
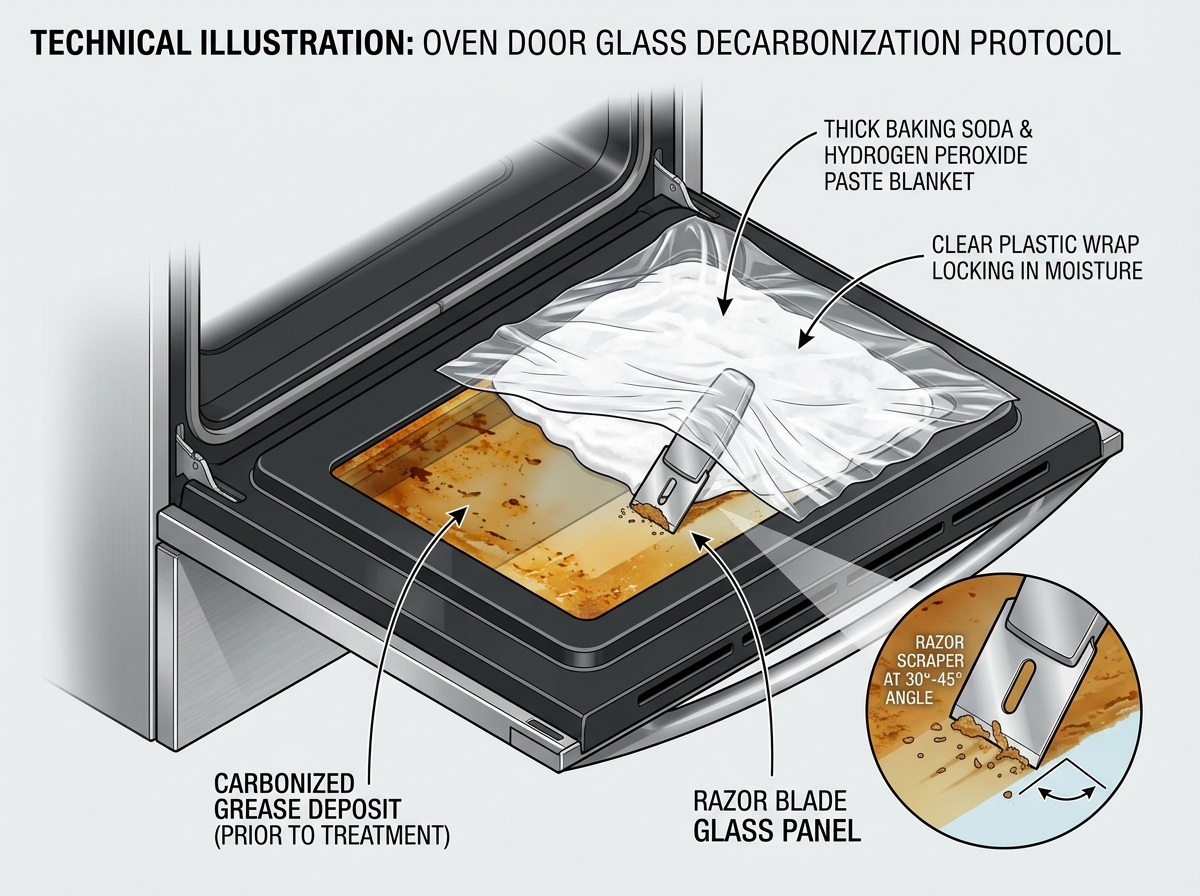
Baked-On Oven Door Double Glass Decarbonization Shave
Oven door viewing window is caked in dark brown, burnt, baked-on grease droplets that ordinary degreasers and glass cleaners cannot penetrate or wipe off.
High cooking heat polymerizes aerosolized animal fats into hard cross-linked resin. Baking soda and peroxide release active oxygen bubbles beneath the carbon matrix, releasing its bond.
- 1/2 cup Baking Soda + 3 tbsp 3% Hydrogen Peroxide
- 1 tsp Liquid Dish Soap (foaming surfactant)
- New single-edge safety razor blade scraper
- Warm water spray bottle & microfiber cloths
-
1Ensure Cold Oven: Never work on a warm oven. Lay an old towel across the lower door hinge gap to catch cleaning residue.
-
2Mix Active Oxygen Paste: In a small bowl, stir 1/2 cup baking soda, 3 tbsp hydrogen peroxide, and 1 tsp dish soap into a thick, spreading paste.
-
3Spread Generous Layer: Coat the entire inner glass window generously with the back of a spoon, keeping 1/2 inch away from rubber edge gaskets.
-
4Allow Chemistry Dwell Time: Let sit for 30 to 45 minutes. Watch the bubbling paste turn from pure white to murky brown as it emulsifies baked carbon.
-
5Mist with Warm Water: Spray the dried crust lightly with warm water to provide fluid lubrication before scraping.
-
6The 30° Low-Angle Shave: Hold a fresh, nick-free safety razor blade flat at a 30-degree angle. Push forward—the blackened carbon peels away like butter!
-
7Wipe Carbon Slurry: Use a damp microfiber cloth to scoop up the loosened carbon shavings and neutralized baking soda paste.
-
8Vinegar Buff to Clarity: Mist with 50/50 water and white vinegar to neutralize residual alkalinity; buff dry for 100% factory glass transparency.
Claim The Complete 117-Page Master Bible
Unlock all 85 crisis protocols and keep the physical reference manual on your shelf forever.
The Home Rescue & Restoration Bible (Core Manual)
All 85 verified crisis protocols across 10 complete home parts. 300 DPI technical schematics, exact pantry recipes, and 8-step guides.
Bonus #1: The 10-Minute Master Diagnostic Matrix
A fast symptom triage decision-tree that pinpoints the exact failure in under 60 seconds before calling a contractor.
Bonus #2: The Pantry Chemistry Formulation Cheat-Sheet
Laminated-style kitchen reference card for quick batch mixing: acids, bases, surfactants, and oxidizers in exact ratios.
Bonus #3: The 365-Day Home Longevity Calendar
The 15-minute Saturday morning preventive schedule that doubles appliance lifespans and stops emergencies before they start.
Bonus #4: The Contractor Quote Defense Handbook
The trade glossary and script to challenge inflated service charges, spot padded bills, and demand transparent trade billing.
Bonus #5: The Seasonal Emergency Freeze & Storm Shield
Critical cold-weather protocols: pipe bursting protection, furnace restart tricks, and power outage prevention steps.
Bonus #6: The Printable Tool & Hardware Reference Card
A pocket field guide with metric/imperial sizing, screw extraction tricks, and hardware thread identifiers.
The 30-Day "Save $100 Or Keep It Free" Triple Guarantee
Take the complete manual into your home for a full 30 days. If it doesn't save you at least $100 on your very first repair, or if you aren't completely thrilled with the step-by-step schematics, simply send an email for a prompt, unconditional 100% refund. You keep the entire 117-page manual and all 6 bonuses as our gift.